Denali Prep – Efficiency and Maintenance

We’ve all heard the trendy sexy alpine aphorism “light and fast.” I suspect it is popular in certain, very cool coffee shops in places like Boulder, Colorado, where aspiring hardmen and women converse over their non-fat, goat milk chai, “Dude–we fired that route because we were so light and fast!” Or, “Yeah, brah, the only way we sent that was ’cause we were so light and fast!”

Hmmm… Sometimes light and fast can mean cold and miserable (or worse).

denali guided climb

What it does not mean on Denali is quickly walking or trotting up the trail. It does not mean skimping on layers that you might need if things go badly and you have to sit for hours with a sick team mate. It does not mean moving up to the next camp straight away, because you made good time climbing up from the camp below.

“Light and fast” on the West Buttress means having your personal kit streamlined in a manner that you have exactly what you need, and little more. It also means being as efficient as possible at specific junctures along the way.

You will quickly learn that heaps of time is spent just standing around, waiting for the team to be ready to move as a group. With some foresight and practice, you can make yourself “fast” and help minimize your contribution to this phenomenon. On the mornings that you are about to move camp, start organizing your kit inside your tent as soon as you wake up. Your goal on those mornings is to get you personal kit out of the tent and into your pack and sled. You’ll need to achieve that goal without holding up the very lengthy process of melting snow for water bottles and warming water for hot drinks. Coordinate with your tent mates, so you can pack efficiently, without bumping into each other inside your nylon home away from home. With a little forethought and some communication, you’ll be the first one at the ropes, ready to clip in and start the day’s work.

Another opportunity for personal efficiency is on the steeper uphill sections of the route. Maintaining a slow and steady pace is the equivalent of being “fast” and will get you to the top feeling much better than someone employing the “jack-rabbit pace” of moving at a quick pace for 20 steps and then stopping to catch his breath.

Read on…

The Rest Step

The Rest Step: Climbing “One Step at a Time”

By Dave Staeheli, (A.K.A. Minister of Silly Walks)

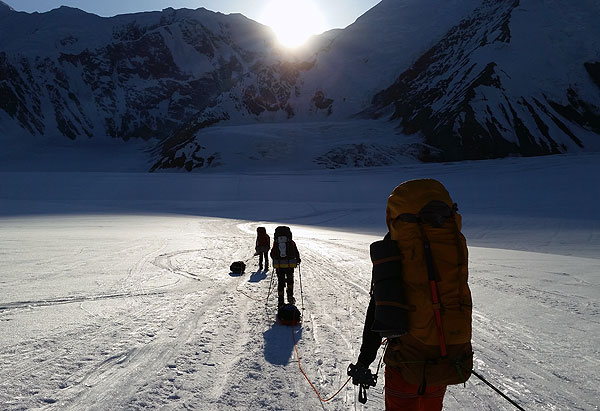
My passion, my avocation, is mountain guiding, specifically in this case, on Denali. After 30+ years, I’ve guided a lot of clients to the Top of North America and one of the important tools I use to get them there will inevitably be the rest step. Usually at least one, two or three climbers per trip tell me at some point that they would not have made it if they hadn’t learned to use the rest step. Why this highly effective method of climbing isn’t better known is a mystery to me.

What is the rest step? Simply put, the rest step is speed control. While climbing at altitude, on steep slopes, with a baby whale strapped to the back, it is difficult to go slow enough to maintain an efficient and aerobic pace. At several points you will probably hear your guides put a lot of stress in going steady, keeping the breathing under control and maintaining that efficient mountaineers’ pace that makes it possible for us mere mortals to climb one of the world’s great mountains like Denali. And one of that keys of that efficient pace is the rest step.

Go slow you say? Anyone can do that, right?” Well, there are a couple of bad ways to do that, and then there is the rest step. The worst way, and we see this quite often on Denali, is something we call “dash and crash,” or “jack-rabbiting.”

This is to move at a normal and natural pace, completely ignoring the oxygenation requirements until the climber is overcome by a lack of oxygen. The climber then has to stop to catch their breath. When they have their breath under control, they then start the process over. This is called going into an anaerobic state, where the muscles and other body tissues are starved of oxygen and lactic acid is produced. Is this climbing efficiently? I think not!

Another way to go slow enough to match your physical output to oxygenation needs is to take “baby steps.” This requires taking shorter and shorter steps in order to keep the pace down. Well this works, but is not the most efficient way to travel. In order to maintain such a slow pace, with small steps, the leg muscles need to keep working as the climber slowly passes one leg out in front of the other. There is a better way to climb, and that is, of course, the rest step. So what is it?

denali climbing

Simply put, the rest step is moving from one resting position to another. Imagine yourself standing on a steep slope and at rest. What is your body position? Probably you are standing with one leg downhill and balanced on the knee joint. Your other leg is uphill with a slightly bent knee and muscles relaxed. Your downhill leg, and consequently your bones, holds most of the weight and the uphill leg helps maintain balance. Now you take one step uphill to another resting position. Wow, you are already doing the rest step! Sounds easy right?

Unfortunately this is a lot harder to put in practice than it sounds. There is a whole lifetime of muscle memory to fight. The most natural thing to do once the leg moves forward, is to make a weight shift to the uphill leg and continue walking. In the rest step, we “rest” or pause between each step. There is a delayed weight shift. We hang out on that back leg for awhile, from a fraction of a second to time enough to take two, three or even four breaths as we grind our way up Profanity Hill to the Summit Ridge. This delayed weight shift, the “rest”, is the most difficult part of learning the rest step.

Where should you learn to rest step? The best place to learn is on a steep-ish slope or perhaps a set of stairs. This technique is difficult to learn on flat terrain. On the mountain I usually wait until we are on the slopes around Kahiltna Corner or up at the 11,200 camp (mostly because my clients think I’m nuts when I try to teach them a new way to walk at a lower elevation!). Even though I’ve been doing the rest step since Ski Hill, I usually have to wait until the mountain has spanked them a bit and are now receptive to a technique that will make their lives easier. The rest step can be learned on a flat slope, but it isn’t easy. When you get good, it is possible to rest step over flat ground. I can do it even downhill. Or backwards! One Mountain Trip guide says he uses it to get up the steps to the bar after a hard day of ski guiding. While I discourage this location to learn to rest step, I suppose it is possible.

We know that the rest step is moving from one resting position to another. I encourage you to start slow, going totally into the resting position before taking another step. As we pick up the pace, it becomes more dynamic, yet there is still that pause before we make the weight shift. Put that front leg out there. Slap it down, get a good crampon bite. This is not a slow motion walk. When you put the front leg out there, move it out at a good clip. Just don’t make the weight shift. After the pause, which as I said can be so short as to be nearly undetectable, make the weight shift. We are learning a whole new muscle memory now, so concentrate on what you are doing until the muscles begin to remember the sequence.

The rest step has some advantages to normal walking. First, it is often advantageous to lock the breathing in with the walking. This is a big help at altitude to keep properly oxygenated. On rough ground this may not be possible, but the rest step still works. We can take a longer pause before or after a big step, a shorter pause before or after an easy step. Working our way through variable terrain, our pace may not appear to be steady, but by adjusting our pauses to the terrain, our breathing stays steady and under control. In addition, the rest step really works well when trail breaking if you ever get stuck out at the sharp end in deep snow.

Some common mistakes are to take short steps like in “baby steps”, or to take the rest on the front leg. Once you practiced at the rest step, you may find your stride lengthens! This can help make up for the fact you are taking a tiny break between steps. The other common mistake is to stride out, weight the front leg, but leave the back leg behind, sort of standing on tip-toe on the back leg. Bones need little energy to carry weight, muscles need a lot. The whole point of resting on the back leg is to let the bones carry the weight. Rest on the back leg, not the front.

Pace, breathing, efficiency, rest step. In my mind these are the keys to making a successful Denali climb. Nowhere in this article have I said going fast is important. But with keeping the first factors working, we can’t help but move efficiently and smoothly, leaving other teams in our dust as they hack away with their inefficient techniques. The turtles win again!

…One step at a time.

Zen and the Art of Water Bottle Maintenance

ZEN AND THE ART OF WATER BOTTLE MAINTENANCE

by: “Sensei” Dave Staeheli

We all love our mountaineering gear. We like to buy it, play with it and maybe even use it. Handling our gear helps us maintain a connection with the beautiful places where we intend to use it.

We need equipment to get us up a mountain, yet we must keep in mind that that same equipment can impede, or expedite, our mountaineering adventure. The right amount of equipment, that we know how to use, will let us flow up the mountain in a Zen-like state, expending the minimal amount of energy on our gear, saving as much of energy as we can for the climb itself.

The wrong gear, too much of it or too little, means we “got the fumbles”, expending wasteful energy that we are really, really going to need later. We are dependent on equipment, yet we don’t really want to be “equipment dependent.”

Mountain Trip sends out an excellent recommended equipment list. The guides have had a lot of input into the list, and if you follow it, you can’t go too far wrong. It does not, however, reflect personal idiosyncrasies or experiences. For instance, “Master Todd” made sure Mountain Trip recommends a 96 oz. pee bottle. I, however, believe that I have reached a higher plane of existence and only require a half-liter pee bottle. I also have my personal experience of 30+ years of arctic, high-altitude mountaineering to help me know what I need. If you don’t have similar experience, it is probably best to go with the Mountain Trip list.

Personal style and experiences can affect your choices, but do you have experience similar to Denali and are you familiar with expedition style mountaineering? What worked well on your trips in the past may not be ideal for Denali. For instance, “layering” of clothes is generally considered good. Some experienced climbers show up with a sack full of light clothing layers and what they consider a “mid-weight” layer. This works well for the environments in which they generally climb.

On Denali, the reality is that it is usually better to consolidate your light layers into two or three items, so consider getting a couple of mid to heavier weight items and use those for temperature adjustment. A light “puffy” or mid-weight fleece jacket is your friend and will be much more versatile than many light layers buried so deep that they won’t see the light of day once the mid-mountain is reached. The Mountain Trip equipment list is a “guide recommended” list and there are good solid reasons behind each item. Exceptions and variances to the list should be well thought out based on your person style and experiences, remembering always, this is Denali!

Returning to the title of this guide’s tech tip, let’s take a basic piece of equipment, one that may change according to your preferences, that may also change as the season progresses, and let’s talk about how to keep the “fumbles” to a minimum. This is the old generic one liter water bottle.

The guides really prefer (read – insist!) wide mouth bottles so they avoid pouring water on their hands when filling them, and wide mouths are less likely to be plugged up when partially frozen. Two are recommended, but a small percentage of climbers should have three, especially in late season when it gets hot on the lower glacier. Hopefully you know who you are.

denali cook tent

I’m a big fan of those hydration bags, “Camelbaks,” for mid to late season on Denali. Mid-season, it is important to use the tube insulators and learn to “back-blow” water away from the mouthpiece, so the tube doesn’t freeze up. Somewhere on the mountain these hydration bags will start freezing up and then it is time to return to the standard water bottles.

Bottle insulators, “cozies,” or “parkas” are a must, but don’t count on them to keep the bottle unfrozen in all conditions. When it gets cold you still have to take your bottle to bed. Learn to take only one bottle to bed and then get a fill up on all the bottles in the morning. Mark your bottles and parkas with name or code. The cook tent can easily have 20 or more empty water bottles to fill, and the guides will want to know who to pass them out to when filled.

Take care of your water. Don’t set your bottles directly down in the snow when it is very cold. If you can, carry the bottles inside your pack unless you are one of the few who know that you need water on the trail between hourly (+/-) breaks. Outside the pack, they are prone to freezing and loss. It is rare to see a guide carry a bottle on the outside of their pack. This becomes especially important above 14,000 feet. I don’t know how many bottles I have seen pop out of the side pocket on a pack and pitch down the side of the West Buttress! If you focus and work on developing the little things to make them into habits, and the “fumbles” will disappear.

The trick about mountaineering equipment is not to have the fanciest or the most, but to have gear that works in most conditions and functions when it counts. Especially important is that your use of the equipment takes little thought or energy. Simplicity, versatility and pre-expedition planning are key avenues to success.

Be known for your Zen-like thoughts and lack of dependency on equipment. Soon Grasshopper, you will be able to climb Denali with your loin cloth and begging bowl.

Can anyone say “Om Mani Den-Nah-Lee Hum”?

What If?

What if?

As guides, we are tasked with helping you have an enjoyable time on your expedition and hopefully help you achieve your goal of standing on top of your mountain. Some of the the tools we bring to the table are our skills, honed through years of experience and training, our understanding of the region based on many previous expeditions, and our institutional knowledge that is shared among our team. Guiding big mountains is partly based in science (physics, math, meteorology, geology…) and partly art. Our goal is to help facilitate the best possible outcome for whatever situation presents itself. Most of the time, we can achieve that goal, but some days the weather, the mountain, your health or any other number of factors will prevent us from arriving at the best possible outcome and we might just have to settle for the best of a number of not-so-great outcomes…

It is important for each of us to understand some of those factors that bias our decision making and can often lead us into a situation without any good outcome. We train our guides to recognize a variety of human factors that can influence our choices and we feel it is important to share some of these lessons with you before you head up on Denali. We’ll try not to get too far out into the weeds, as this can be heavy stuff, but it is important.

denali team

Summit Fever: We all want to reach the summit. While we love being in the mountains and embrace the journey of an expedition, ultimately we want to stand on top! That desire can be a source of strong motivation and can help us to dig a bit deeper into our reserves, but it can also have a direct and potentially negative effect on our decision making. It can lead a climber to not be forthcoming while communicating how he or she is doing, for fear of being “turned around.” It’s better to turn back one day and try again a few days later than to have a souvenir of frostbitten fingers or toes…

Be honest with yourself about your motivations for climbing Denali.  If you don’t get a shot at the top, do you think you could still have a great time camping and climbing on a big, cold mountain like Denali?  We’ve often thought it might be a good exercize to have each climber write a short paragraph on how you think you would feel if you don;t get to stand on tiop.  Put the paper in an envelope, seal it, and tuck it way – hopefully, you’ll not need to open it, but it might be interesting to compare your projected thoughts with how you actually feel, should you not be able to stand on the summit.

Why don’t we do what those guys are doing?: This is a classic heuristic trap – assuming that because another climber or team is doing something that it would be a good choice for you or your team. Who knows what factors are influencing their decision? I’ve seen some wacky choices made on Denali and more than a few really bad outcomes that resulted from decisions I sure would not have made… Please trust that your guides want to summit, but that they want to do so in a fashion that will hopefully yield the best possible results for you and your team members. Folks who are prepared to summit at all costs or to accept getting frostbite while attempting the top should probably be on their own program.

denali camp at 14200

My Teammate _______ (isn’t as committed / didn’t train like I did / got sick / smells funny / is a jerk / etc… etc…):  The key word in any variation of that statement is “team.”  In a perfect world, we’d all have more than enough time to train, spend years honing our mountain skills, and be super friendly to one another 24/7.  We’d also get to do exactly what we want to do at each point of our lives and especially on our expedition!  Dreamy, eh?  Remember the cliche, “There’s no ‘I’ in TEAM.”  We do our best to screen prospective climbers so that we are comfortable with their skill level, but ultimately, it’s hard to make certain that someone who says they are comfortable employing French crampon technique can actually walk pie en canard.  We discuss fitness levels with our climbers and work with many on their personal training program, but not everyone will show up in possession of Herculean strength and endurance.

The beauty of a TEAM is that it enables us to be stronger collectively than we could possibly be as individuals.  If you’re having an off day, the team can help you get the day’s work completed.  Working as a team gives us many more options for having a good outcome.  It also means that sometimes, the needs of the team could outweigh the needs of an individual.  Do your best to remember that you elected to be part of a team, regardless of what situation might arise.  Rather than put energy into becoming increasingly frustrated by a teammate’s _______ (apparent lack of resolve, lack of training, stinky feet, etc), ask yourself and your guides how you might help in a manner that will elevate the entire team?  This comes back to something we repeat over and over – communication.  Communicate your thoughts with your guides, so they can help form the best possible solution to whatever is affecting the team.

Share Button